
Great marketing isn’t an endpoint: it’s an ongoing process. That means constant tests, tweaks, and experiments to ensure your website is connecting with customers.
These changes shouldn’t be applied randomly, of course. It has to be done systematically so that you know which changes are having a positive effect, and quantify the improvements. While you could do that manually — changing the production site and seeing how much your site metrics change — it’s both very labor-intensive and risky.
A dedicated conversion rate optimization (CRO) tool like Google Optimize is a far better option — it’s cost-effective, it’s scalable, and pretty easy to use. Best of all, it allows you to do things like split testing and multivariate testing without a developer. Google Optimize is the perfect tool for no-code makers using Makeswift to build beautiful and effective websites.
What is Google Optimize?
Google Optimize is a website optimization tool that helps website owners and marketers test different variations of website layouts and content. The goal of this testing is to increase website conversion rates and improve the user experience.
Google Optimize integrates natively with Google Analytics, which makes it easy to access any goals and traffic data already in Google Analytics, although it is possible to use Google Optimize with other analytics tools.
Why use Google Optimize?
There are a number of reasons why Google Optimize is an ideal tool for marketers:
1. It's free
Google Optimize comes with a free tier, just like it’s counterpart Google Analytics. This free tier is very comprehensive, as it unlocks nearly every feature and capability of Google Optimize for anyone to use.
Google Optimize does have a paid tier, Google Optimize 360, which has better audience targeting, advanced admin controls, and higher limits on the number of experiments and sites you can run. However, costs for Optimize 360 can run as high as $150,000 a year, so it’s more appropriate for large-scale enterprises.
2. Minimal technical setup
Not a developer? Don’t fret. Setting up Google Optimize is a simple process. Just create your Google Optimize account and connect it to your Google Analytics account.
You will then need to install Optimize onto your website by adding a small snippet of code to your site’s HTML. In Makeswift, you can easily do this using the code snippets feature.
Some installations will result in rare cases of “page flicker” which is what happens when you configure an experiment on Google Optimize and you see the original page content before the test content. Your website will briefly appear with the page’s default styles before loading the external CSS stylesheet. This causes the page to re-render and make the page elements look like they “jumped.”
Fortunately, Google offers an anti-flicker snippet that is relatively easy to install, especially if you’re using an easy-to-use, no-code website builder like Makeswift.
3. Run A/B tests on your entire website
Google Optimize will let you test every part of your website, from your home page to your product page to your contact page — even down to individual sections.
You don’t have to worry about it disrupting normal visitor flow as you test. With Google Optimize, you can portion parts of the traffic in between different page versions. You’ll be able to test entirely new pages and divert traffic accordingly.
4. Personalize web content
If you want to personalize content based on individual traffic sources, Google Optimize has powerful user segregation and filtering controls. You’ll be able to test how well your proposed change will align with a given target audience and be able make data-driven decisions on your website’s design.
Introduction to Conversion Rate Optimization
Let’s take a step back for a second. Why use Google Optimize and similar tools at all?
To answer, let’s briefly discuss Conversion Rate Optimization (CRO). CRO is the process of increasing the percentage of website visitors that take a desirable action. This action, called a “conversion,” can be anything from signing up for a webinar to purchasing a product.
Tools like Google Optimize assist in this process by testing which design, copy, and layout changes are more likely to result in more conversions. Once you find out which change is more effective, you can apply that change to the final website.
Most of these changes only represent incremental improvements. While there are occasionally dramatic spikes in conversion rates after an A/B test, CRO’s real value is felt in the long-term. Multiple small improvements will add up to larger returns further down the line.
If you’d like to know more about conversion rate optimization, CXL.com offers a series of fantastic training programs. Talia Wolf is also a recognized CRO expert and has lots of free resources you can learn from.
Types of CRO tests
CRO is more than simply making a change and seeing what happens. If you don’t know what you’re doing, you may end up doing more harm to your website than good. There is a correct way to conduct a CRO process, and that’s through proper application of tests.
CRO tests in Google Optimize can generally be broken down into three primary types:
A/B Testing
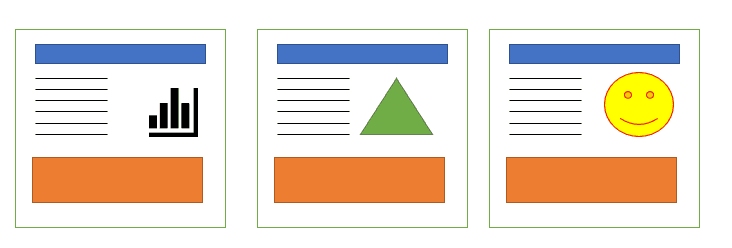
A/B testing is when you compare the performance of your original or “control” version of your web page with one or more alternative versions. A proper A/B test only changes one element in between versions — that could be the design of a button, the placement of an image, or a headline font.
The more alternative versions you test, the more groups you’ll need to split your audience into and the smaller your sample size will be. You’ll have to run the test longer in order to compensate for the smaller sample size.
Multivariate testing
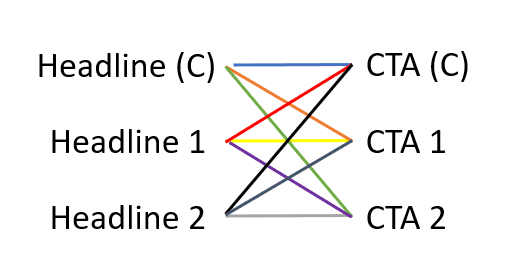
Unlike A/B testing, which only tests one element at a time, multivariate testing tests multiple variables at once. Such an experiment helps improve the website faster, but also results in a large number of combinations to test.
If, for example, you want to test 2 new headlines and 2 new CTA buttons, that would mean testing 9 different variations (don’t forget your control headline and control CTA). You’re going to need a lot of traffic to split it up 9 ways and still have a decent sample size.
This makes multivariate testing more appropriate for enterprise companies and/or websites with very high traffic volume.
Redirect test
A redirect test is a kind of A/B test where you test different web pages against each other. These web pages can have either minor variances or entirely different layouts. Each variant would have its own unique URL, with incoming traffic segregated and allocated as per the requirements of the test.
Redirect tests are best used for testing multiple landing pages, or perhaps for testing a different web page layout. You can easily create these variants through your Makeswift interface.
Personalization
In Google Optimize, personalization is when you selectively display elements to users based on factors like location, their device, browsing history, referring link, and more.
Personalization tests are more complex due to the sheer number of available factors, which may or may not help drive conversions. This makes personalization tests harder to set up and manage effectively.
Also, more and more users are taking steps to hide their data and preserve their privacy, which may affect the accuracy of personalization tests in the long term.
Heuristic analysis
A/B testing and multivariate analysis are very useful, but what if you’re still in the process of building your website and have no idea exactly what to optimize? Or what if your website doesn’t attract enough web traffic or monthly conversions to make a useful test?
A heuristic analysis doesn’t rely on web traffic, so that may be a good alternate solution that lets you work within your means. It’s not officially considered a CRO test — at least, not at the same level as A/B and multivariate testing — but it can fulfill that purpose in a pinch.
The word heuristic means encouraging a person to learn or solve problems on their own, and so a heuristic analysis evaluates how well a user can figure out how to navigate your website. It’s a process used to discover usability problems and is popular with web development teams.
In a heuristic analysis, a group of 3-5 experts examines your website according to a set of heuristic design and usability principles and your website’s stated goals. The analysis is simple and repeatable, and can be a resource-efficient way of improving your site’s traffic and conversion rates.
Heuristic analysis isn’t possible to do in Google Optimize, but it’s a part of the CRO process. It helps identify which tests you’d like to run based on heuristic research, so it’s still worth mentioning here.
You can review Talia Wolf’s Heuristic Analysis Guide for step-by-step instructions.
How to set up Google Optimize
Before we run a test on Google Optimize, we first have to set it up. It’s a simple, 4-step process.
1. Create your Google Optimize Account
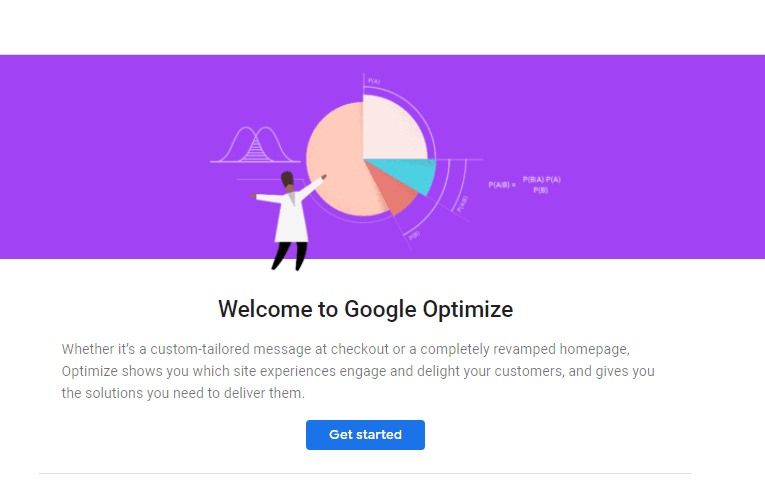
Go to optimize.google.com and sign in with your Google Account. Click on the Get Started button.
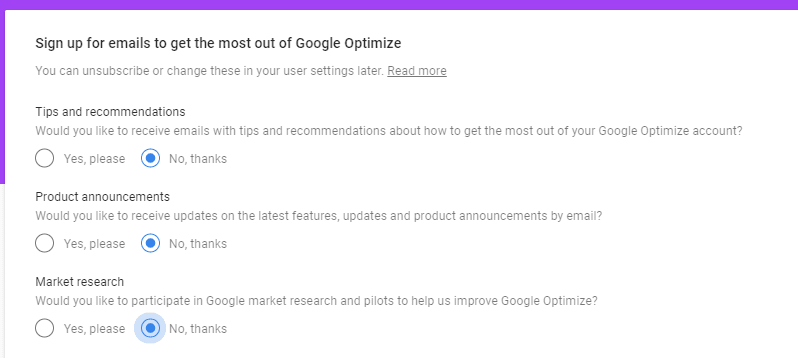
You’ll be asked to set up your email preferences and survey request settings.
You’ll then have to configure your account settings.
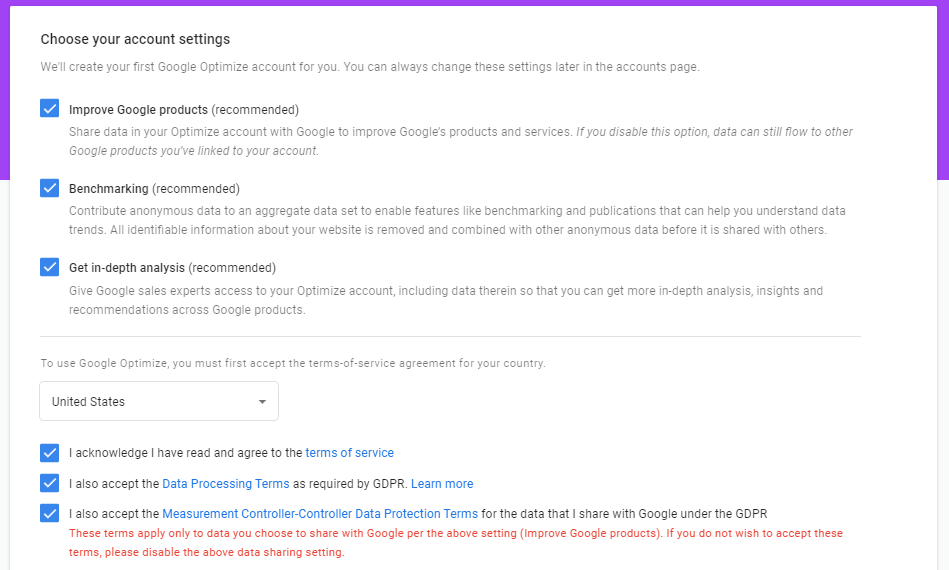
After you confirm your settings, you’ll be brought to your Optimize home page.

Before you create your first experience, however, you still have to perform an additional step.
2. Link your Google Analytics account
Linking to Google Analytics is strictly optional. As I mentioned earlier, you can link Optimize to whatever traffic analytics tool you want. But since most people already have an Analytics account, it’s simpler to start with that.
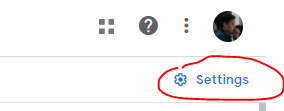
Go to the upper-right corner of your screen and click on the Settings link.
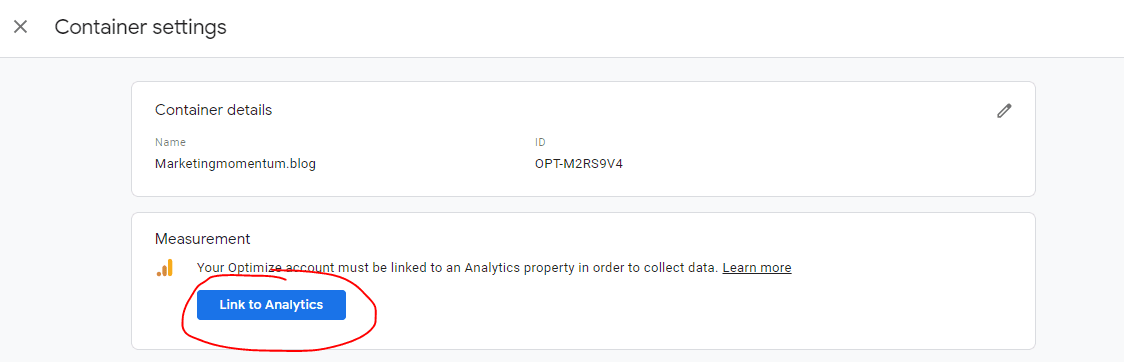
Go to the Measurement panel and click on the Link to Analytics button.
From there, click a Google Analytics property and click on the Link button when you’re done.
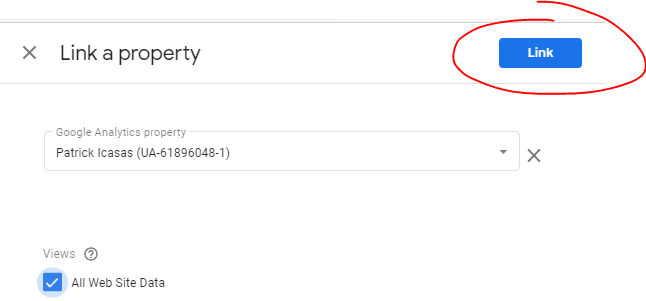
That’s it! You’ve now connected Google Analytics to Google Optimize.
3. Add the Optimize snippet to your site
The next step is adding a short sequence of code called a “snippet” to your website’s HTML code.
To get the snippet, go back to the Settings menu and go to the section marked Setup Instructions.
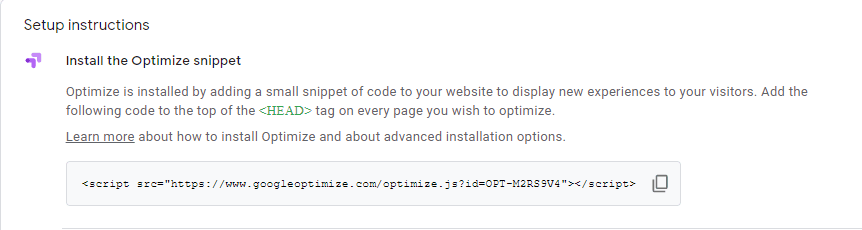
Copy the script shown in the window and paste it into the <head> of your website’s HTML. Google has a detailed guide that can help you if it’s your first time editing the HTML code, and also offers an alternate setup method that uses Google Tag Manager.
Makeswift users can easily add the Google Optimize script to their websites using the snippets feature.
4. Install the Google Optimize extension

You will have to install the Google Optimize Chrome extension in order to use the visual editor and run installation diagnostics.
Click Install Extension and follow the instructions.
How do I run a test on Google Optimize?
To run a test on Google Optimize, simply click on the Create first experience button. If it’s your first experiment, you’ll find the button in the middle of your screen.
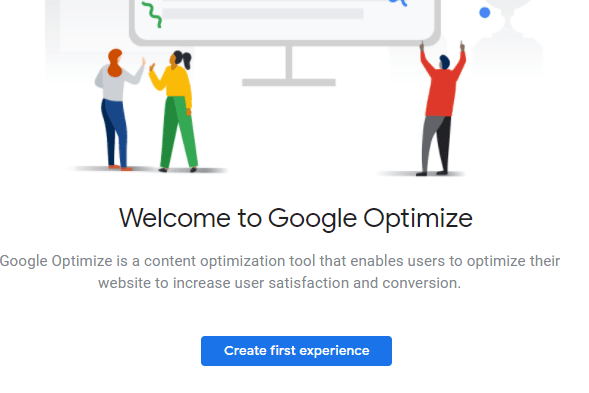
Otherwise, you can find it on the upper-right corner of your screen.
Setting up an experience
Once you click on “Create Experience” you’ll be asked to provide the following information:
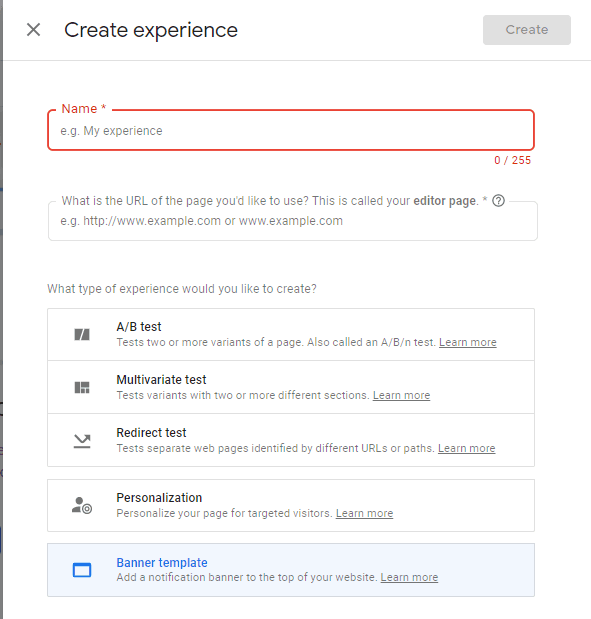
- Name of the experience
- URL of page being used (aka the editor page)
- Type of experience (test) being run:
- A/B test
- Multivariate test
- Redirect test
- Personalization
Note that there’s another option called a “Banner template.” This is a relatively recent addition to Google Optimize and not an actual test. According to the official Optimize resource hub, the Banner Template is supposed to help inform your customers about important changes to your business such as hours of operation, shipping policies, and services offered. The banner is not a testing-related feature.
Creating variations
Once you’ve made your selections, click Create at the top right of the panel. You’ll then be taken to the Experience management page.

Click on Make Site Changes and you’ll be taken to the Visual Editor where you’ll be able to create variations for your website without having to type in a single line of code.
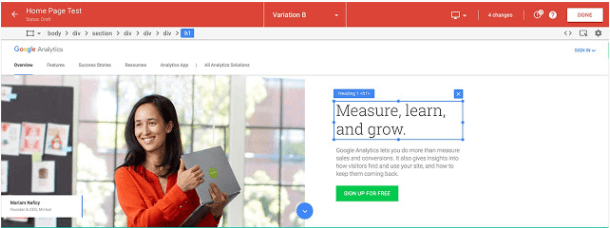
Simply click on an element, and the Visual Editor will allow you to edit, move, and delete existing elements while also letting you add new ones.
You can create variations based on a number of different UI elements, including image choices, CTA button colors and text, and the arrangement of elements. You can even personalize copy for different users based on specific UTM parameters (see “targeting” below).
Note that you need to be using Google Chrome and have the Google Optimize plugin installed for this to work.
Objectives
Once you’ve set up a variant, you have to decide what that variant is trying to measure. Are you testing for improvements on page views? Session duration? Click-throughs?
In the free version, you’ll be able to choose from one primary objective and two secondary objectives. These can’t be changed once the experience starts to run, so choose wisely. You can also add a hypothesis to record your predictions for the test, but this is strictly optional.
Note that you can use your Google Analytics Goals as experience objectives, provided you’ve already linked your Optimize and Google Analytics accounts.
Targeting
Google Optimize allows you to target specific groups of users to make your test more effective.
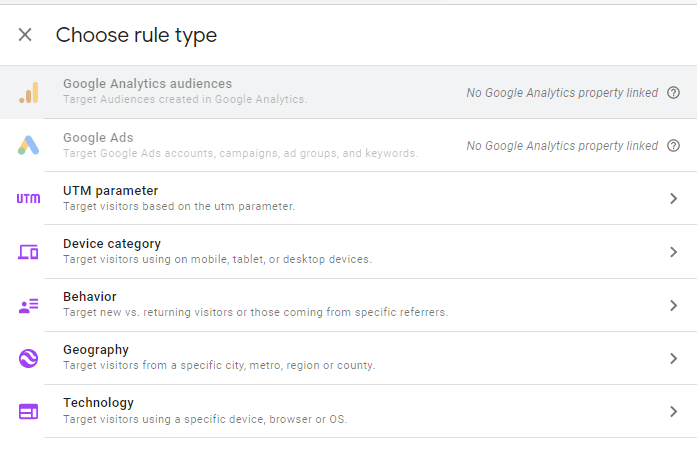
As you can see, there are a lot of targeting options to choose from — both Basic and Advanced. Choose the targets that best meet your goals, but don’t be too specific. If your targeting is too narrow, you risk reducing the traffic per variant to a critically low number, which will impact the usefulness of your test.
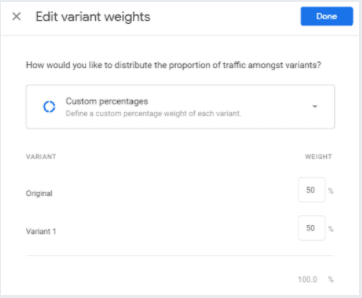
You can also set variant weights so that you can change the proportions of which variant gets which traffic.
Feel free to start your experiment once you’ve finished setting the objectives and targeting details.
Measuring and reporting results
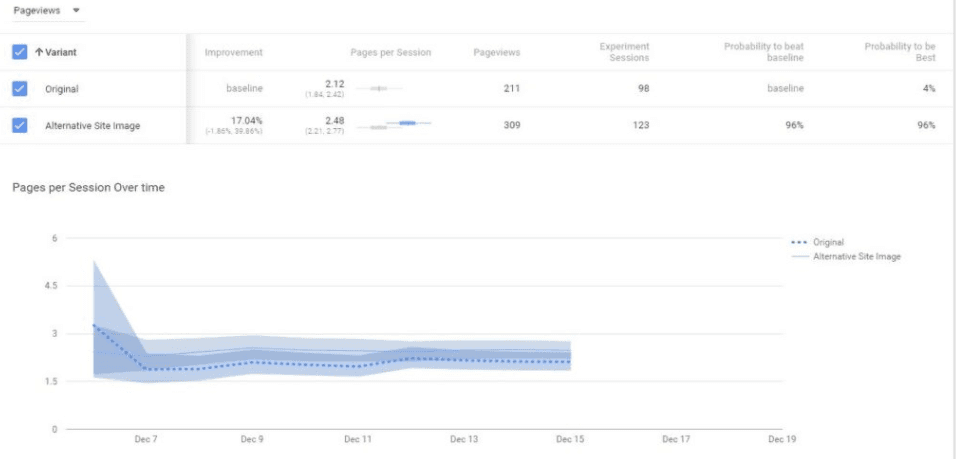
When you want to know the results of your Google Optimize experience, simply go to the Reporting tab.

Here, you’ll be able to see a comparative chart that shows the performance of each variant (along with the control) over time.
Here are a few things to keep in mind that will help you obtain a useful report:
- Starting an experiment is easy, but pausing it and editing the parameters is not. Make sure everything is configured properly prior to starting the report.
- Google Optimize recommends that you run an experiment for a minimum of 2 weeks in order to get enough data for a decent result. The smaller your sample size is (in the case of multivariate testing or a website with low traffic), the longer you’ll need to run the experiment.
- For A/B tests to be relevant, your experiment will have to show enough data (at least 370~ conversions per test). Alternatively, look for a 20%-30% lift in conversion rate of the desired outcome.
Applying the results
Once the experiment is done and you’ve collected the final results, you should be able to tell which variant will bring you the most conversions. This change can then be applied to the production site, either by giving it to your web designer or by applying it yourself through the Makeswift no-code builder.
Remember to keep tracking the performance of the new layout using Google Analytics or similar software to see if the predicted lift in performance actually occurs.
And remember, CRO is a long-term process, so keep running those experiments! Constantly test and tweak your site design in order to gradually build up those conversions. When you look back at your progress a year later, you’ll be surprised at just how much your conversions have grown.